Introduction
When it comes to off-grid living—whether you’re navigating the open road in an RV or sailing the coast—the efficiency of your solar system is only as good as its stability. Many DIYers focus heavily on the wattage of their panels or the capacity of their batteries, often overlooking the most critical link: the mounting hardware.
In this guide, we’ll dive into why the Universal Z-Bracket is the industry standard for small-to-medium solar setups and why the underlying material science is the secret to a decade of rust-free performance.
1. What is a Solar Z-Bracket?
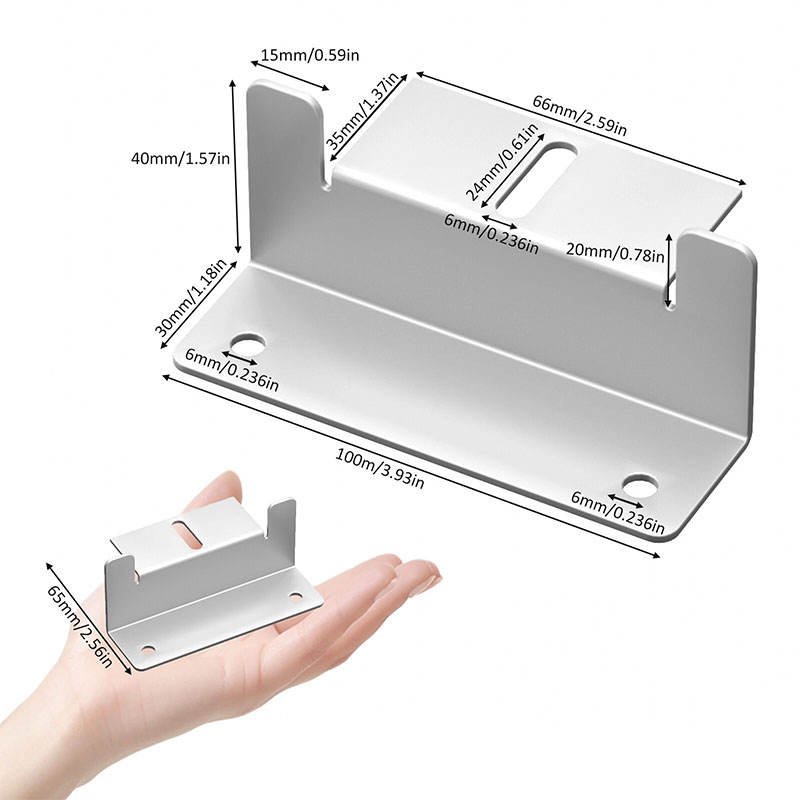
A Z-bracket is a specifically shaped mounting foot designed to secure aluminum-framed solar panels to flat or slightly inclined surfaces. Its “Z” profile serves two vital purposes:
Structural Support: It provides a wide footprint for bolting down while maintaining a slim profile.
The “Air Gap” (Thermal Efficiency): It lifts the panel roughly 1 inch off the roof. This gap allows for 360° airflow, cooling the panel. Did you know? For every degree a solar panel rises above25°C(77°F), its efficiency can drop by roughly 0.3% to 0.5%. Proper ventilation is literally free energy.
2. Material Science: Anodized Aluminum vs. Standard Steel
As professionals in the metal and fastener industry, we cannot stress this enough: Never use standard galvanized steel for solar mounting. Our Z-bracket kits utilize High-Strength 6005-T5 Aluminum Alloy with an Anodized Surface. Here is why this matters:
Corrosion Resistance: Anodizing creates a hard, non-reactive oxide layer. Even in salt-heavy marine environments, the aluminum won’t pit or rust.
Weight-to-Strength Ratio: Aluminum is roughly 1/3 the weight of steel, reducing the “dead weight” on your RV or boat roof without sacrificing wind resistance.
Thermal Expansion: Aluminum brackets expand and contract at a similar rate to the solar panel’s aluminum frame, preventing stress fractures on the mounting holes over time.
3. Step-by-Step Installation Tips
Installing a 4-piece Z-bracket kit is a straightforward DIY task, but precision is key.
Dry Fit First: Attach the brackets to the solar panel frame using the included short bolts and flange nuts before taking the panel onto the roof.
Mark and Prep: Place the panel on the roof, mark the hole locations, and remove the panel.
Waterproofing (Crucial): If you are drilling into an RV roof, apply a generous amount of Butyl Tape or a high-quality Lap Sealant (like Dicor) under the bracket foot before driving in the long bolts.
Vibration Proofing: Always use the included spring washers. Road vibrations and engine hum can loosen standard nuts over time; our kit’s locking hardware ensures everything stays tight.
4. Beyond the RV: Versatile Applications
While most popular in the VanLife community, these brackets are the “Swiss Army Knife” of solar mounting:
Marine/Yachts: Perfectly handles the constant moisture and salt.
Off-Grid Sheds: Easily mounts panels to corrugated metal or wooden roofs.
Traffic & Signage: Used for mounting remote sensors and solar-powered lights.
Conclusion
Don’t let a $2.00$ bolt or a cheap, non-anodized bracket be the failure point of your $500.00$ solar array. Investing in high-quality, corrosion-resistant mounting hardware is the best insurance policy for your mobile power plant.
Ready to upgrade your off-grid setup?